
How to Organise Your Digital Images in 4 Steps

One of my passions as a photographer is memory keeping and creating tangible items that embody your precious moments in time for years to come. This is where The Story Keeper stemmed from, this continual series explores all areas of creating, preserving, organising and maintaining your own family story // Bec Zacher
I know just how overwhelming it is having thousands of images living on your computer, old CD’s, dusty hard drives or wherever else your images from the past decade may have ended up. I want to help you tackle the overwhelm and get them organised so I’m going to run you through the system I use that has helped me organise my last 15 years of images!
Head over here if you’re looking for tips on getting your phone images organised instead.
01 ~ Create a Backup System
First up before you can get stuck into organising your images, you need somewhere to actually give them a central home so they can all live in one place. This is where a backup system comes into play.
The best method of backup is going to be very different for everyone but here is what I do. I have a minimum of three backups and these are both hard copy backups and cloud backups.
Main main large home hard drive (8TB in size). This is my central drive that houses everything. Let’s call it my Digital Photo Hub.
I then have smaller yearly hard drives (2-4TB in size) that I use per year for personal and client photo storage.
I use a cloud backup service called BackBlaze that runs in the background of my computer and continually backs up all my hard drives and computer content every day. This means if everything was lost at home I still have a cloud-based backup that I can use to restore all my files. Use can use my link to try Backblaze free for a month.
A few extra tips ~
I personally use Western Digital drives and have not had any issues with them so far. I have had lots of issues with Seagate drives in the past so I no longer use those.
Some other great options online / cloud-based options are DropBox or Mylio which I have heard some great things about.
The reason that I don’t back up on my actual computer hard drive is that I don’t want to clog it up and make it run slow having thousands of images stored on it.
To get your back up sorted ~
Go and buy yourself a hard drive that you can use to start organising all your images. If you have years worth to go through, 4TB or larger would be suitable.
Alternatively, look into an online backup service like DropBox which is a great tool but can be more expensive than a hard drive option as it has a yearly fee. I love the combination of having a portable hard drive/s and cloud-based back up working together.
02 ~ SET UP FOLDERS
Now that you have a hard drive / main storage home (your Digital Photo Hub) for all your digital images and videos, the next step is to set up folders to organise all of your images into.
To give you a quick overview, you are going to be organising all your images by Year > Month > Event
Set-up a main folder called Photos on your Digital Photo Hub
Next up, create yearly albums for as far back as you have photos to organise. (You can see below that I have folders from 2015 until the present).
Within those yearly albums create monthly albums. (Create all the monthly folders within one year and then copy and paste all those albums into the other yearly folders).
Now that’s all set up, you have somewhere for all your images to live and a central place to organise them in.
Here is an overview of how my images are organised using this system:
Option 1 – Organise by Months, Then Events
This is how I currently structure my folders from each year.
All my images live within my Digital Photo Hub master folder > then I have yearly folders > then I have monthly folders > then I create event folders for that month depending on what’s happening that month.
If there are no specific events, I often create a ‘home’ and an ‘out and about’ folder and all the images that I take during the month reside in these folders.

Option 2 – Organise by Events
If organising into months is a bit overwhelming, within your yearly folders, break the year down into key events instead. I have done this for earlier years where I wasn’t taking as many photos and having events worked really well. I created additional albums such as Family, Friends, and College to add images that were taken throughout the whole year and didn’t fit into a single event.

03 ~ COLLAGE ALL YOUR IMAGES
Next step is to collate all your images in one place! I want you to get out all those hard drives, CD’s, open the folders on your computer, access the online storage systems you might have and just get all those images in one place.
Grab a piece of paper and write down all of the places that your images are and then one by one you are going to start transferring these images into the folders on your Digital Photo Hub.
If you don’t keep track of what you have moved and sorted through, it’s easy to lose your place.
Here is the process I use :
Collate all your images and then grab a piece of paper and write down where all of your images are. You will come back to this list regularly and tick off what has been moved and sorted through.
Drag all of the images into the relevant yearly folders. On a Mac, you can drag all the images into the main yearly folder and then click on ‘Date Modified’ in the top bar. It will then arrange all of your images by the date which is awesome! You can then select a whole month of images and place those images into the monthly folder.
*As I mentioned above, if you would prefer to organise by event, sort your images by date and then enlarge the thumbnails of the images so you can see them clearly and then add images into specific events and create these new event folders as you go.
04 ~ SORT AND CULL ALL YOUR IMAGES
Now that your images are all in one place, now it’s time to dive in and go through them. You may have done this at step 3 when you imported all of your images into the folders but if not now it’s time to go through them.
I find that this method works really well as everything is in one place now, it’s all backed up and I can then go through and delete all of the duplicates, missed and blurry images and curate an entire year of images into key photos that capture the best memories from the year.
CULLING TIPS
Be ruthless when you cull! Just think about how many images you are going to have by the time you’re 60 if you are storing thousands upon thousands of images from every year.
My top tips for culling images are to go through and when you have multiples from one event/moment, choose the images that tell the story of the moment in the most powerful way. Which images have the most connection and feeling when you look at them? Which images conjure up a story of that moment that you never want to forget?
Once you have deleted a bunch, empty your trash and get excited about how much space you no doubt have just freed up on your computer / hard drives.
Lastly but most importantly….backup your Digital Photo Hub regularly after each organising session and I suggest backing it up in more than one location.
You are now well on your way to having your images organised in such a way that it is a whole lot easier to create tangible memories with them!
If you have years and years worth of images, this process of going through and curating and culling your images is going to definitely take time! Set yourself a goal to sit down once a week for 15-30 minutes and do one folder/year or month at a time. (If you are part of the Story Keeper Photo Challenge, use your ‘Tackle the Backlog’ checklist to keep track of where you are up to).
05 ~ Extra step: A word for those that use Lightroom / Photoshop or shoot RAW.
If you’re a photographer or have a camera and shoot in a RAW file format, or even if you shoot in JPEG and wish to edit all your images before you save the final copies, here are a few extra tips for you!
I shoot all my own personal family images on my DSLR camera (currently a Sony A73 which I love!) and I also shoot in RAW. This means I have a whole extra step to do when it coming to sorting my current images as they need to be edited.
Here is my process each month with my own personal images that are shot in RAW:
At the end of each month I plug in my memory card and use a program called Photo Mechanic which ingests all my images so I can view and cull them on the spot BEFORE I save them to my hard drives. I go through and choose all the images I want to keep for the month and then on my external hard drive I create have a folder titled >2020 Personal RAWS > Month > Event (I have this set up for every month the same as the structure I have listed in step 2 but these are all the files I need to edit before I save the final copies to my main Digital Photo Hub on my large external hard drive).
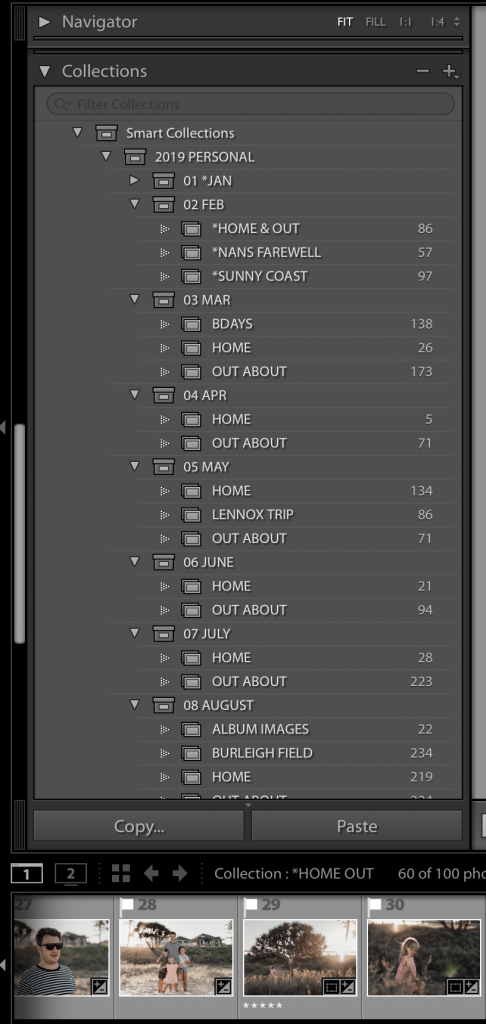
At the start of each year I set up a new Catalog in Lightroom for personal images and within that Catalog, I have folders for each year and then the events within those folders. These are named exactly the same as the folders on my hard drive.
I then edit all of my personal images from the month and save the finals to the main folder on my Digital Photo Hub drive. I keep my RAW files and the final JPEG files in separate folders as I want my main Digital Photo Hub to be a collection of finished edited complete images ready to be used for photo books and prints. I do keep my personal RAW files in case I want to go back and edit my images in a different format at any time.
Here is a look at my 2019 Personal Lightroom Catalog and how I structure my folders:

Questions? + Join the Story Keeper Community
I really hope that you have found this helpful and gleaned some tips for yourself that you can start implementing today! I know you might have questions so come join the Story Keeper Private Facebook group where we all chat and share tips together and make sure you come join the Story Keeper Instagram community as well.