
How to install Lightroom presets

Welcome to the Story Keeper, an online educational hub equipping photographers with resources to run their biz and edit their art.
Today I’m going to walk you through how to install the Story Keeper Desktop presets or any desktop preset pack that you own, into Adobe Lightroom Classic.
It will only take you a few minutes to get them installed so let’s jump in and get started.
First up we need to work out which version of Lightroom you’re using. There are a number of versions out there and the process varies amongst them all, as does the file type you will need. The Lightroom version we will be focusing on in this tutorial is Adobe Lightroom Classic CC, version 7.3 and higher. All new presets packs that you purchase will be XMP files and will be compatible to install within these versions of Lightroom.
You can check which version of Lightroom you have by opening the program and going to ‘Help’ and then ‘About Adobe Lightroom’. To install the Story Keeper Desktop presets (or any XMP preset files), you need to be running Lightroom 7.3+ versions.
If you are on an earlier version, you will need to update your software before proceeding with the installation if you are working with XMP preset files. (Any new presets that you purchase will be sold in the XMP file type. The older versions of Lightroom take a file type called LRT files which are no longer used).
If you are using an older version of Lightroom and would still like to use the SK presets, the Signature preset pack contains both LRT and XMP files.
Step 1 - Download your files
Unzip the main 'SK Heirloom Desktop Presets.zip' that you downloaded from your order email. Within this ZIP file you will find an install guide and the preset pack in another Zip file. Leave the preset pack in it’s zipped file.
Step 2 - Open Lightroom Develop module
Open Lightroom Classic on your desktop and navigate to the Develop module. When you have this open there are two simple ways you can install yoru preset pack.
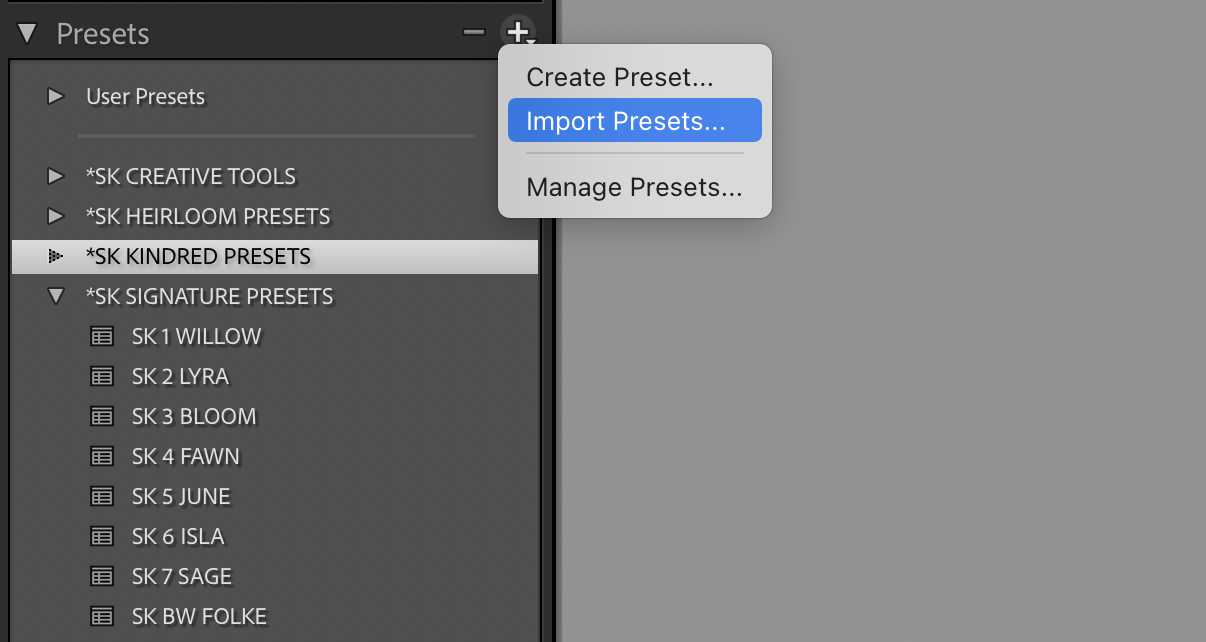
1 - In the Presets panel on the left hand side, click on the + icon at the top right of the preset panel area and choose the Import Presets option.
2 - Or head to the Menu bar and click File > Import Develop Profiles and Presets.
3 - When the import box opens, choose your downloaded ZIP file named ‘Story Keeper Presets XMP.zip' or whatever preset pack you are looking to import. (Don’t expand your ZIP file before you import it. You need to import the ZIP file for the import to work correctly). Make sure that you are selecting the correct file type - the XMP files. Once you have selected the Zip folder, click Import.

Step 3 - You’re ready to edit!
Now you’re ready to go! Your new presets will be added to your preset area which you can view when you are in the Develop module. They will be visible under the Preset area and if you expand the preset name, you will see the various presets and tools within the preset pack.

View the Story Keeper Preset & creative tools collection
The Story Keeper Presets are loved by thousands of photographers across the globe and have been designed to simplify the editing process and elevate your images.

A collection of versatile presets created with warm undertones, natural earthy colours and film-like tones. These presets have been designed to be simple to use, timeless and suitable for use with a variety of lighting situations.
These presets have been created to prioritise skin tones in a variety of lighting situations so you can create consistent and beautiful imagery every time. Speed up your workflow, create a cohesive portfolio and edit in a timeless style!
BUNDLE & SAVE! Spend $120, save $10 - Code BUNDLE120 | Spend $200, save $20 - Code BUNDLE200 | Spend $300, save $40 - Code BUNDLE300.

An ode to slow days, the soft warmth of the spring sun, gentle conversation and deep soulful connection.
These presets are softer on the eye than the previous packs. They lend themselves beautifully to a range of imagery shot in a variety of locations. Think soft shadows, pastel and copper tones, crushed blacks and that hazey nostalgic timeless look.
These presets have been created to prioritise skin tones in a variety of lighting situations so you can create consistent and beautiful imagery every time!
BUNDLE & SAVE!Spend $120, save $10 - Code BUNDLE120 | Spend $200, save $20 - Code BUNDLE200 | Spend $300, save $40 - Code BUNDLE300.
* Please note that all sales are final as this is a digital product.

A beautiful collection of versatile presets created with warm, natural creamy tones and nostalgic vibes.
Within the collection, there are presets which feature clean whites, rich blacks and natural tones. Plus others that are more stylised and film-like and embody all the feels of your mama’s photo albums. These presets have been created to prioritise skin tones in a variety of lighting situations so you can create consistent and beautiful imagery every time!
BUNDLE & SAVE! Spend $120, save $10 - Code BUNDLE120 | Spend $200, save $20 - Code BUNDLE200 | Spend $300, save $40 - Code BUNDLE300.
Pin for later


Related posts


An honest Flodesk review from a photographer who finally invested in email marketing. Discover why this simple email platform is perfect for creatives.